Release Management for ETQ
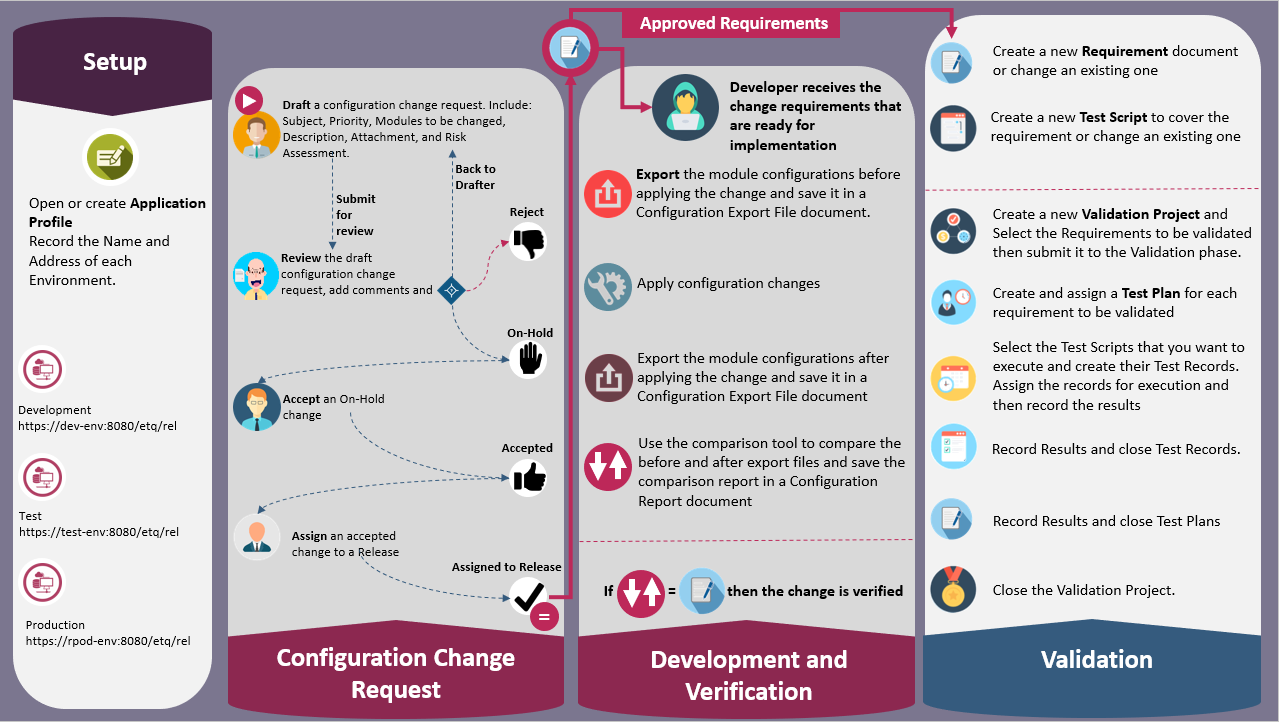
Validation Process
Create an Application Profile
- Create a new Application Profile from the New Document menu or open the existing on found under: Setup > Application Profile.
- Go to the Environments section and add a record for each of the environments to be used.
- Enter a unique name of the environment.
- Enter the environment address using this URL format: http://server-name:port/context/path. E.g. (http://MyServer:8080/etq/reliance).
Managing Requirements
|
|
 Review your requirements and make sure that they are well structured and related together as a parent and child. Start recording the child requirements and approve them so you can relate them to their parent requirements while they are being approved.
Drafting a Requirement
- Create a new Requirement from the New Document menu.
- Fill out the Requirement Information section.
- Add the Requirement Description and attach related material.
- Save and Close the Requirement for a later update or submit it for approval.
Pending Requirement documents are listed under Validation > Requirements > Open > by Assigned view.
Relating Requirements Together
- Open a pending Requirement and scroll down to the Child Requirements section.
- Pick from the view among the complete requirements that are considered child requirements for the current requirement document.
- Save the requirement document. A link to the direct child requirement will appear under the Child Requirement section. If the linked requirement had a child, then a twisty will appear next to the requirement link. When the twisty is clicked, it will show links to the children of the child requirement.
Approving or Voiding a Requirement
- Open your assigned Requirement document from the Validation > Requirements > Open > by Assigned view.
- Review the provided information. Submit the document back to the Draft phase for corrections, move it forwards to the Completed phase if you found it complete, or void it at this stage if you found it incorrect for any reason.
Complete Requirement documents are listed under the Validation > Requirements > Completed view category.
Pending Requirement documents are listed under Validation > Requirements > Open > by Assigned view.
Creating a new Requirement Revision
- Open an approved Requirement and click on the Change action.
- In the created Change Request, fill in the Reason for Change, select the Assigned To user and the Due Date.
- Attach any related material and submit the Change Request for the Accepted Change Request phase.
Accepting a Change Request will generate a new Requirement revision at the Draft phase, so you could apply the required changes.
If you create a Change Request and then you found it invalid, you could void it.
All Change Requests are listed under the Validation > Requirements > Change Requests > by Phase view.
Obsoleting a Requirement
- Open an approved Requirement and click on the Obsolete action.
- In the created Obsolete Request, fill in the Reason for Obsoletion and submit the request for Approval.
- The user responsible for approving the Obsolete Request can open the request form the assignment email or from the Validation > Requirements > Obsolete Requests > by Phase view and submit it to the Accepted phase or void it.
Once the Obsolete Request is accepted, the Requirement along with its Obsolete Request will be moved to the archive application.
Managing Test Scripts
Creating and Approving a Test Script
- Create a new Test Script from the New Document menu.
- Fill out the Test Script Information section.
- Attach the Test Script Files and attach related material.
- Pick from the view among the complete requirements that are covered by this Test Script.
- Go to the Applicable Settings section and select the type of the setting that is covered by the Test Script, then select the settings from the field that will be displayed below the options. For instance, when you select the Applications option in the Applicable Settings section, the Applications field is displayed allowing you to select the names of the Application Settings affected like the Document Control or Audits Management.
- Submit the Test Script for Approval. It will be assigned to the specified Owner.
- Being the Owner of the document, open the Test Script and review the provided information and the attached script file. You can send the Test Script back to the drafter to apply corrections, approve the Test Script, or void it if found incorrect for any reason.
Test Scripts are listed under the Validation > Test Scripts view category.
Creating a new Test Script Revision
- Open an approved Test Script and click on the Change action.
- In the created Change Request, fill in the Reason for Change, select the Assigned To user and the Due Date.
- Attach any related material and submit the Change Request for the Accepted Change Request phase.
Accepting a Change Request will generate a new Test Script revision at the Draft phase, so you could apply the required changes.
If you create a Change Request and then you found it invalid, you could void it.
All Change Requests are listed under the Validation > Test Scripts > Change Requests > by Phase view.
Obsoleting a Test Script
- Open an approved Test Script and click on the Obsolete action.
- In the created Obsolete Request, fill in the Reason for Obsoletion and submit the request for Approval.
- The user responsible for approving the Obsolete Request can open the request form the assignment email or from the Validation > Test Scripts > Obsolete Requests > by Phase view and submit it to the Accepted phase or void it.
Once the Obsolete Request is accepted, the Test Script along with its Obsolete Request will be moved to the archive application.
Validation Project
Preparing the Validation Project
|
|
 Validation Projects are used to validate more than one requirement document. If you want to validate a specific requirement that does not have child requirements, you could open the Requirement document and create your Test plan directly from there.
- Create a new Validation Project from the New Document menu.
- Fill out the Project Information tab.
- Select the requirements to be validated.
- Submit the Validation Project to the Validation phase.
Open Validation Projects are listed under the Validation > Validation Projects > Open > by Assigned view.
Create and Assign Test Plans
- Open your assigned Test Plan from the Validation > Validation Projects > Open > by Assigned view or from your assignment email.
- Go to the Validation tab and click Create Test Plans. A Test Plan will be created for each Requirement included in the Validation Project.
If you update the Validated Requirements, you must go to the Validation tab again and click the Update Test Plans action; to create new Test Plans for the newly included Requirements and void the Test Plans created for the removed requirements.
- Open each Test Plan and send it to the Validation phase so assigned users could start the validation process.
Execute the Test Scripts and Create the Test Records
- Open your assigned Test Plan from the Validation > Validation Projects > Test Plans > by Assigned view or from your assignment email.
- Open the attached Test Script files attached to the Test Plan and execute them manually on the specified test environment.
Notice that the system would ask you to Synchronize Test Scripts if newer versions became available. Where you will have to click on Synchronize Test Scripts and then save the Test Plan.
- Click on Generate Test Records to generate a Test Record for each included Test Script.
- Attach the Test Results to the Test Record, then specify the test result status as Pass or Fail.
- Submit the Test Record for the Completed Phase if the test record is complete or void it if it became invalid for some reason.
Test Records are listed under the Validation > Validation Projects > Test Plans view category.
Working with Test Plans and Generating Test Records
- Open your assigned Test Plan from your assignment email or from the Validation > Validation Projects > Test Plans > by Assigned view.
- If newer versions of the attached Test Scripts are available, the Synchronize Test Scripts action will be displayed. Click the action and save the Test Plan so the system can get the latest Test Scripts links to the Test Plan.
- Select the test scripts you want to run and then select the Test Environment.
- Generate Test Records.
- Open each Test Record and open the attached Test Script, download it, and execute it.
- Attach the executed test script and select the test result status as pass or fail.
- Complete the Test Record.
- Completed Test Records are listed under the Validation > Validation Projects > Test Plans > by Phase view
- Go back to the Test Plan. You can optionally add a comment to each test record by expanding the subform record of the test record and clicking Add Comment.
- Record the overall execution results then complete it.
Completed Test Plans are listed under the Validation > Validation Projects > Test Records view-category.
Approving a Validation Project
- Open the Validation Project and review the Test Plans
- Complete the Validation Project.
Configuration Change Management Process
Configuration Change Request Process
- Create a new Configuration Change Request from the New Document menu and send it for Review.
- As the user assigned to review the change request, do the steps below.
Open the change document from the assignment email or from the Configuration Change Management > Configuration Change Requests > Open view-category.
Review the change request, and optionally update the Target Date and Target Release fields and send the change to the On-Hold phase to keep it until it gets approved.
You have the option to send the change back to the drafter to provide more information or you can reject it.
- As the user assigned to the On-Hold Configuration Change Requests, do the steps below.
Make sure that the Target Date and Target Release fields are filled in correctly.
Send the change to the Accepted phase.
- As the user assigned to Accepted Configuration Change Requests, do the steps below.
Open the change document from Configuration Change Management > Configuration Change Requests > Accepted view-category.
Make sure that the Target Release field is set correctly and send the change to the Assigned to Release phase.
|
|
|